The eTAM Optimizer is an easy to use optimizer tool made up of the Set-up, Splits grid and summary of results. Users can select from the seven predefined optimizer goals, and control how the optimizer will place spots in the the splits grid. With the new eTAM Optimizer, users will have access to the eTAM report tab, whereby users can further analyze each possible schedule generated and export one or all schedules based on markets or station. eTAM Optimizer schedules can be exported into two file formatsThis will further simplify the creation and exporting of eTAM Schedules.
Optimizer Setup
The eTAM Spot Optimizer is the first step to generating an optimized schedule. The Setup section is made up of the Overall Goal, the options that are related to it (see table below). And the Market, Day Part and Network splits which control what number format can be entered in the splits grid - dollar % or exact dollar values.
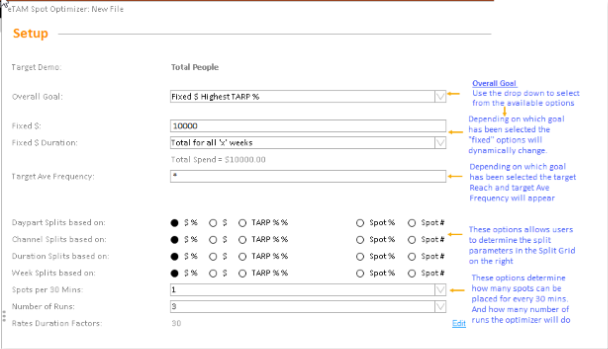
Image Title
Optimizer Goals
Users have nine goal options in which the optimizer can optimize to, the below table illustrates the available options when each Optimizer goal has been selected:
| Optimizer Goal | Fixed $ | Fixed $. Fixed $Duration | Fixed CPT | Fixed Reach (%) | Fixed TARP% | Target Reach | Target Ave Frequency | Outcome |
|---|---|---|---|---|---|---|---|---|
| Fixed $ Highest Reach | Enter campaign budget e.g $10000 | Budget total across all weeks, or per week. The total spend will adjust depending on the length of the campaign. | N/A | N/A | N/A | Select the required reach e.g. 1+ or a range e.g. 1-3+ can be selected | Frequency must be range if required. e.g 0-8 which means "no more than 8 times" | Optimizer will optimize based on a fixed budget with the highest reach possible, |
| Fixed $ Highest TARP % | Enter campaign budget e.g $10000 | Budget total across all weeks, or per week. The total spend will adjust depending on the length of the campaign. | N/A | N/A | N/A | N/A | Frequency must be range if required. e.g 0-8 which means "no more than 8 times" | Optimizer will optimize based on a fixed budget with the highest rating possible. |
| Fixed $ Highest TARP % and Reach | Enter campaign budget e.g $10000 | Budget total across all weeks, or per week. The total spend will adjust depending on the length of the campaign. | N/A | N/A | N/A | Select the required reach e.g. 1+ or a range e.g. 1-3+ can be selected | Frequency must be range if required. e.g 0-8 which means "no more than 8 times" | Optimizer will optimize based on a fixed budget with the highest TARP and highest reach. |
| Fixed $ and CPT Highest Reach | Enter campaign budget e.g $10000 | Budget total across all weeks, or per week. The total spend will adjust depending on the length of the campaign. | Enter the $ value for the market in the Splits Grid. | N/A | N/A | Select the required reach e.g. 1+ or a range e.g. 1-3+ can be selected | Frequency must be range if required. e.g 0-8 which means "no more than 8 times" | Optimizer will optimize based on fixed budget, fixed CPT with the highest reach possible. |
| Fixed Reach Lowest Cost (Overall) | N/A | N/A | N/A | Enter the target Reach for the campaign e.g. 60% | N/A | Select the required target reach e.g. 1+ or a range e.g. 1-3+ can be selected. | Frequency must be a range if required e.g. 0-8 which means "no more than 8 times". | Optimizer will optimize based on the fixed reach % and target reach at the lowest cost overall |
| Fixed Reach, Lowest Cost (Market Goal) | N/A | N/A | N/A | Enter target Reach in the Splits Grid for market. | N/A | Select the required target reach e.g 1+ or a range e.g. 1-3+ can be selected | Frequency must be a range if required e.g. 0-8 which means "no more than 8 times". | Optimizer will optimize based on the target market reach % at the lowest cost possible |
| Fixed TARP% Lowest Cost | N/A | N/A | N/A | N/A | Enter the required TARP % | N/A | Frequency must be a range if required e.g. 0-8 which means "no more than 8 times". | Optimizer will optimize based on the Fixed TARP at the lowest cost possible |
| Fixed $ Fixed Reach | Enter campaign budget e.g $10000 | N/A | N/A | Enter the target Reach % e.g 45% | N/A | Select the required target reach e.g 1+ or a range e.g. 1-3+ can be selected | Frequency must be a range if required e.g. 0-8 which means "no more than 8 times". | Optimizer will optimize based on the Fixedbudget$ and Fixed Reach. |
| FIXED $ Fixed TARP Fixed Reach | Enter campaign budget e.g $10000 | N/A | N/A | Enter the target Reach % e.g 45% | Enter the required TARP % | Select the required target reach e.g 1+ or a range e.g. 1-3+ can be selected | Frequency must be a range if required e.g. 0-8 which means "no more than 8 times". | Optimizer will optimize based on the Fixed budget, fixed TARP and Fixed Reach |
| Fixed $ Fixed TARP % | Enter campaign budget e.g $10000 | N/A | N/A | N/A | Enter the required TARP % e.g. 30 | Select the required target reach e.g 1+ or a range e.g. 1-3+ can be selected | Frequency must be a range if required e.g. 0-8 which means "no more than 8 times". | Optimizer will optimize based on the Fixed budget Fixed TARP. |
Splits Based on:
This options allow users to set parameters in the splits grid on the right hand side of the screen. The available options are "$", dollar percent " $%", These formats can be applied to Day Parts, Channel , Duration and weeks.
By selecting dollar "$" users will be entering exact amounts in the splits grid. If the amount entered exceeds the “fixed $” amount, the total spend will go red. With the dollar %, this allows users to allocate a percentage of the budget.
In the example below $10000 is the fixed budget for the campaign. Of that,50% of the budget is to be spent on Peak and off peak (100%), Only 25% of that budget to be spent on National Geo and Discovery. However the optimizer can only spend upto $2000 on the first week.
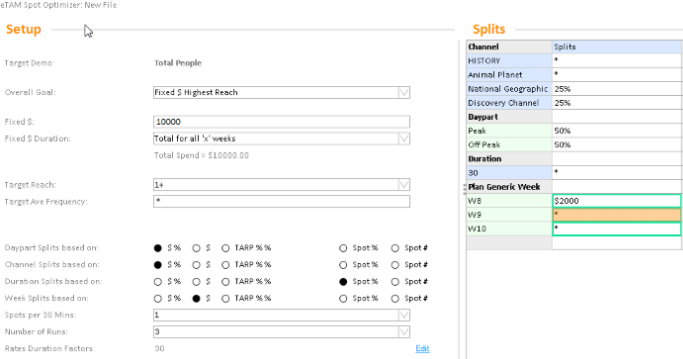
Image Title
Spots per 30 Mins
This option allows users to allocate how many spots the optimizer may place per 30 minutes. Use the drop down menu to select.
Number of Runs
This option allows users to set how many runs the optimizer will do. The optimizer can complete up to five runs.
Splits Grid
The Split Grid allows users to determine how the optimizer will allocate spend and or ratings. Users can allocate a set amount or allow the optimizer to determine the best outcome.
Below are the Splits rule:
-
If the grid is left empty the optimizer will automatically determine the best outcome.
-
If an asterisk “*” has been entered, the optimizer MUST place spots however the amount is not specified.
-
If a zero “0” is entered, the optimizer WILL NOT place spots.
-
If a user leaves a cell blank the optimizer can decide to use the cell or not.
-
If they enter an amount in a cell the optimizer will target this exact amount + or – a small variance of 1% of the amount.
-
A range can be entered in any section, for example 10% - 50%, this will allow the optimizer to allocate 10% to a max of 50% (+ or – 1%)
-
The % or Value must add to 100 vertically within the section.
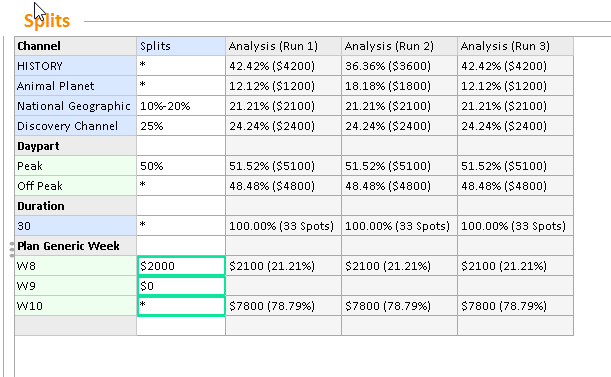
In the example below, the Splits Grid hase been utilized to determine where the budget will be spent. 10-20% on National Geographic, 25% on Discovery channel and the natural fall on History and Animal Planet.
Of that budget, 50% must be during peak and only upto $2000 on W8, no activity on W9 and the natural fall on W10.
When the optimizer has run, the Analysis columns indicate what percentage of dollars and actuall amounts (spots or dollars) has been placed. In the below the optimizer has spend $4200 in History which is 42.42% of the budget etc.
Splits Grid Right Click Options
The grid has a default layout which comprises ofChannel, Day Part, Duration and {lan Generic week. Users can customize the layout by nesting sections together such as Market by Network. Or alternatively, users can re-order the grid by dragging the item sections to their desired location.
To return the Splits Grid to its original layout, users can right click anywhere on the grid and select “Revert to Original”. Below lists the available options from the right click menu:
-
Revert to Original - this will revert to the default layout. Not items entered in the grid will be lost, unless returned to the exact format which it was entered in.
-
Collapse this section - this option, if right clicking on a specific section such as Network, it will only collapse the network level.
-
Collapse All - Collapses all Split grid sections
-
Expand All - Expands all grid sections
Results:
Once the optimizer has completed, it will present the possible schedules in the Results grid, the grid can display up to five solutions (or as specified in the set-up). The results will be presented as a basic summary report, with the best result for each data type highlighted in orange. User can view the detailed spot list by simply double clicking on the run or on the “View Spot List” link on the left of the grid. The spot list will open as another tab within the Optimizer set-up screen.
The report tab can be utilized to analyse the results. It will include the Optimizer Session and Run “x” report attributes, which must remain in the report layout and cannot be removed. Users can use the layout assets to customize the report.
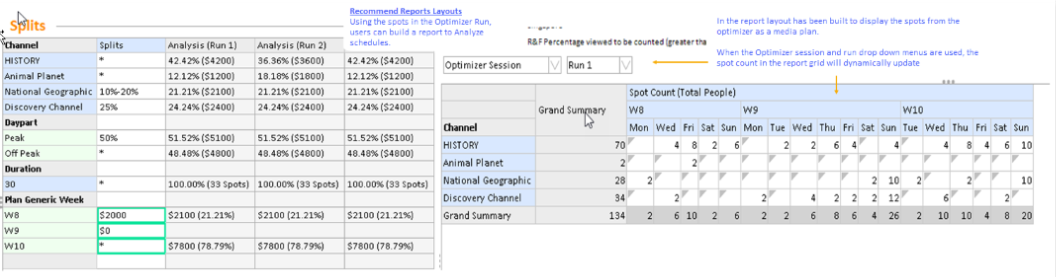
Image Title
Exporting schedules:
Possible schedules can be exported via two methods - by right clicking on the Results grid or the "Export" button. The spots can be exported as an .aes file for importing into Schedulizer (Australia Only) or .xml. Once a file format has been selected, a menu will appeart which enables users to control which Run and/or which markets to export. Users can also select to split the schedule by market or by station; this enables users to send schedules to thier Channels (if applicable).
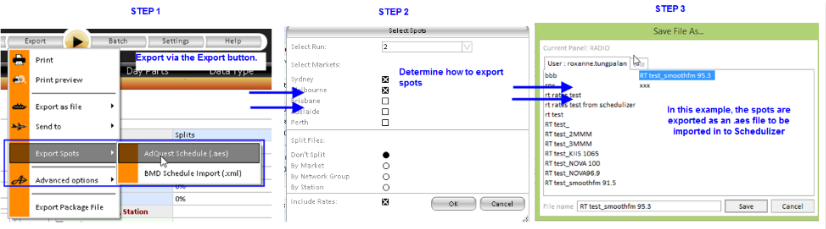
Image Title